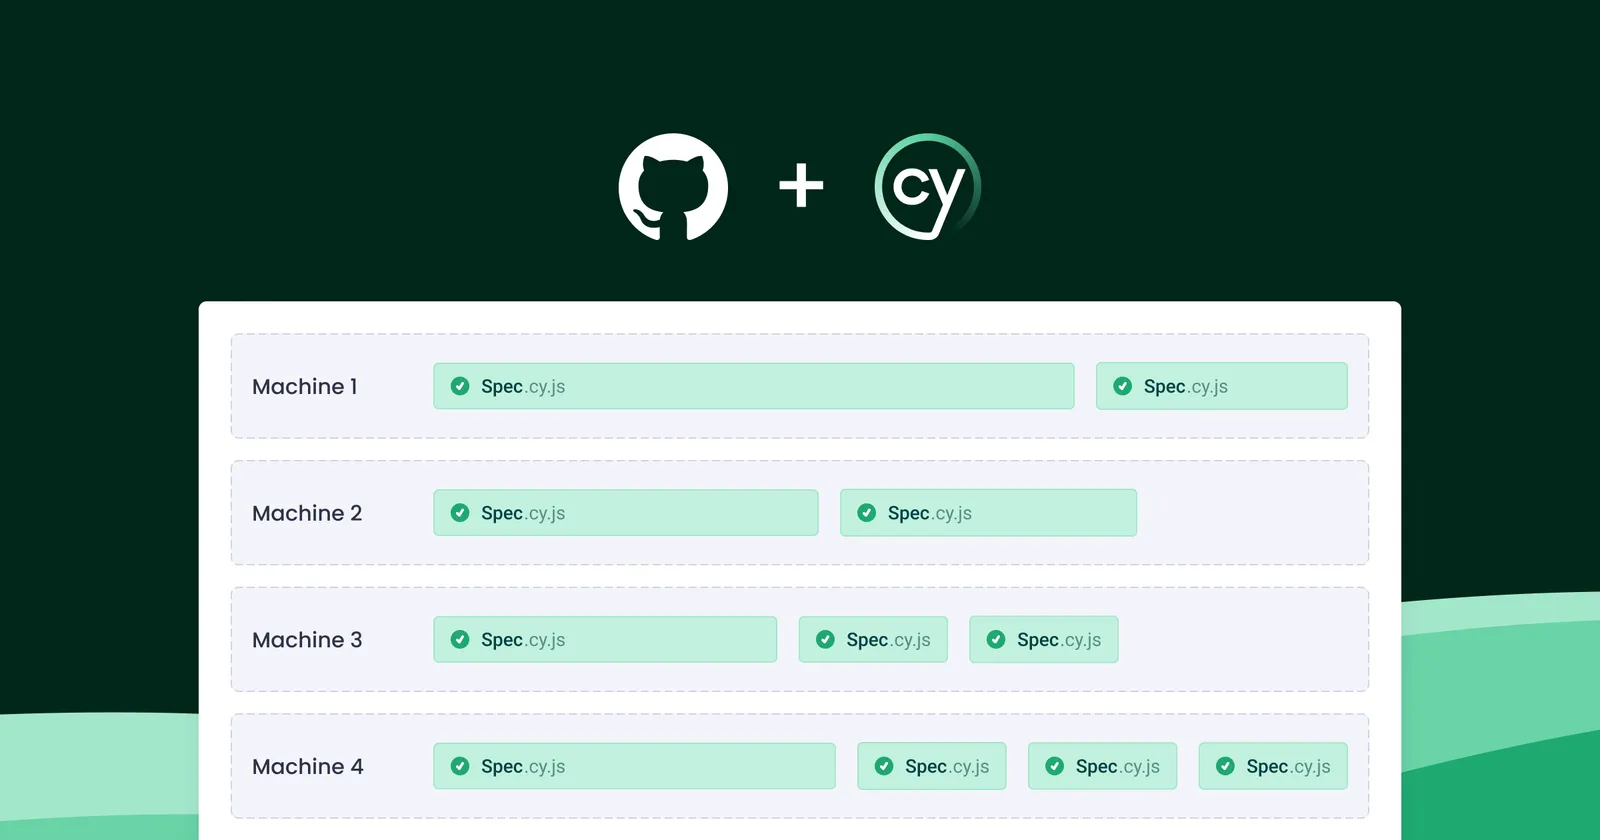
In a world where time equates to money, minimizing execution time for various actions is imperative. This holds true for testing, where parallelizing test cases becomes a key strategy to reduce testing durations and accelerate test suite execution. Cypress Cloud, in conjunction with GitHub Actions, facilitates the parallel execution of test cases, enabling simultaneous testing across multiple computers or environments.
This blog post will explore the following aspects:
- Introduction to Cypress Cloud and configuring Cypress Cloud
- Integration of Cypress Cloud with GitHub Actions
- Execution of tests in parallel using GitHub CI/CD Actions
But before delving into Cypress Cloud and CI/CD GitHub Actions, let's first understand what Parallel Test Execution is and its benefits.
What is Parallel Test Execution?
Parallel testing is a software testing technique where multiple test cases are executed simultaneously instead of sequentially. This approach allows tests to run concurrently on different environments, devices, or browser setups, significantly reducing the overall test execution time. By executing tests concurrently, testing becomes more agile and responsive.
Benefits of Parallel Test Execution:
Reduced Execution Time: Parallel test execution significantly reduces the overall time required to execute a suite of tests, making the testing process more time-efficient.
Increased Test Coverage: Parallel execution enables broader test coverage within a given timeframe, ensuring a more thorough testing of the application.
Optimized Resource Utilization: Utilizing resources more effectively by distributing test cases across multiple machines or environments leads to better resource utilization and faster feedback in continuous integration pipelines.
Enhanced Scalability: As test suites grow, parallel execution provides a scalable solution, allowing testing teams to handle larger volumes of test cases without a linear increase in execution time.
Efficient Utilization of CI/CD Pipelines: Parallel test execution integrates seamlessly into continuous integration and continuous deployment (CI/CD) pipelines, enabling faster builds and deployments by concurrently testing different aspects of the application.
Cost-Efficiency: Faster testing cycles contribute to cost savings by reducing the expenses associated with prolonged testing phases, fostering a more economical software development process.
Now that we've explored the benefits of Parallel Test Execution, let's gain insight into Cypress Cloud and its benefits, and then proceed to understand how to configure Cypress Cloud.
What is Cypress Cloud?
Cypress Cloud is a comprehensive and cloud-based testing solution that enhances the capabilities of the Cypress testing framework. Designed to streamline and optimize the testing process, Cypress Cloud provides a centralized platform for managing, executing, and analyzing tests in a scalable and collaborative manner. Teams can leverage the cloud infrastructure to run tests across different environments, ensuring consistent and reliable results. Cypress Cloud provides developers and QA teams with valuable insights into test executions, making it an integral part of modern CI/CD pipelines. Its user-friendly interface and seamless integration with Cypress make it a powerful solution for organizations looking to optimize their end-to-end testing workflows in a cloud-based environment.
Going beyond fundamental features like parallel test execution, Cypress Cloud brings advanced capabilities to streamline your testing workflow. With the imminent launch of its application quality products, Cypress aims to broaden the impact of its tests, ensuring peak performance, responsiveness, and usability. This commitment aims to not only delight users but also foster user retention.
Key Features of Cypress Cloud:
Parallel Test Execution: Run tests in parallel to achieve faster results and reduce overall testing time. Cypress automatically balances your test specs across the available machines, with no need for manual configuration.
Dashboard and Insights: Access a centralized dashboard providing detailed test results, analytics, and insights. Maintain a comprehensive history of your test results, including video clips, screenshots, and full stack traces.
Flake Detection: Focus your time and resources on addressing the most chronically flaky tests in your test suite. Leverage Flaky Tests Analytics to prioritize tests based on recency, frequency, and severity, ensuring robust and reliable testing.
Test Replay: Wind back the clock to any point in your application's execution and precisely observe its behavior during a test failure. Inspect the DOM, network events, and console logs exactly as they ran in CI, facilitating efficient debugging and issue resolution.
Spec Prioritization: Accelerate your deployment times and swiftly validate the impact of your latest changes on a CI build by automatically prioritizing test specs that failed in the previous Cypress run.
Auto Cancellation: Safeguard valuable CI resources by automatically canceling a Cypress run after a configurable number of tests fail, preventing unnecessary resource consumption and facilitating efficient resource allocation.
CI/CD Integration: Cypress Cloud effortlessly integrates with well-known CI/CD tools like GitHub, GitLab, and Bitbucket. This seamless connection serves as a robust safeguard, preventing the integration of faulty code into your main branch. By bridging Cypress Cloud with CI/CD tools, the testing process is streamlined, contributing to an overall enhancement in efficiency.
Branch Review: GitHub-integrated users can easily analyze the before-and-after view of test suite changes, so they can swiftly pinpoint the differences, streamline review cycles, and prevent regressions. Identify newly failed, flaky, pending, added, or modified tests before merging with your main codebase.
Configuring Cypress
Before configuring Cypress Cloud we need to Create a Cypress Project with some test cases that we will execute later on.
Install Cypress
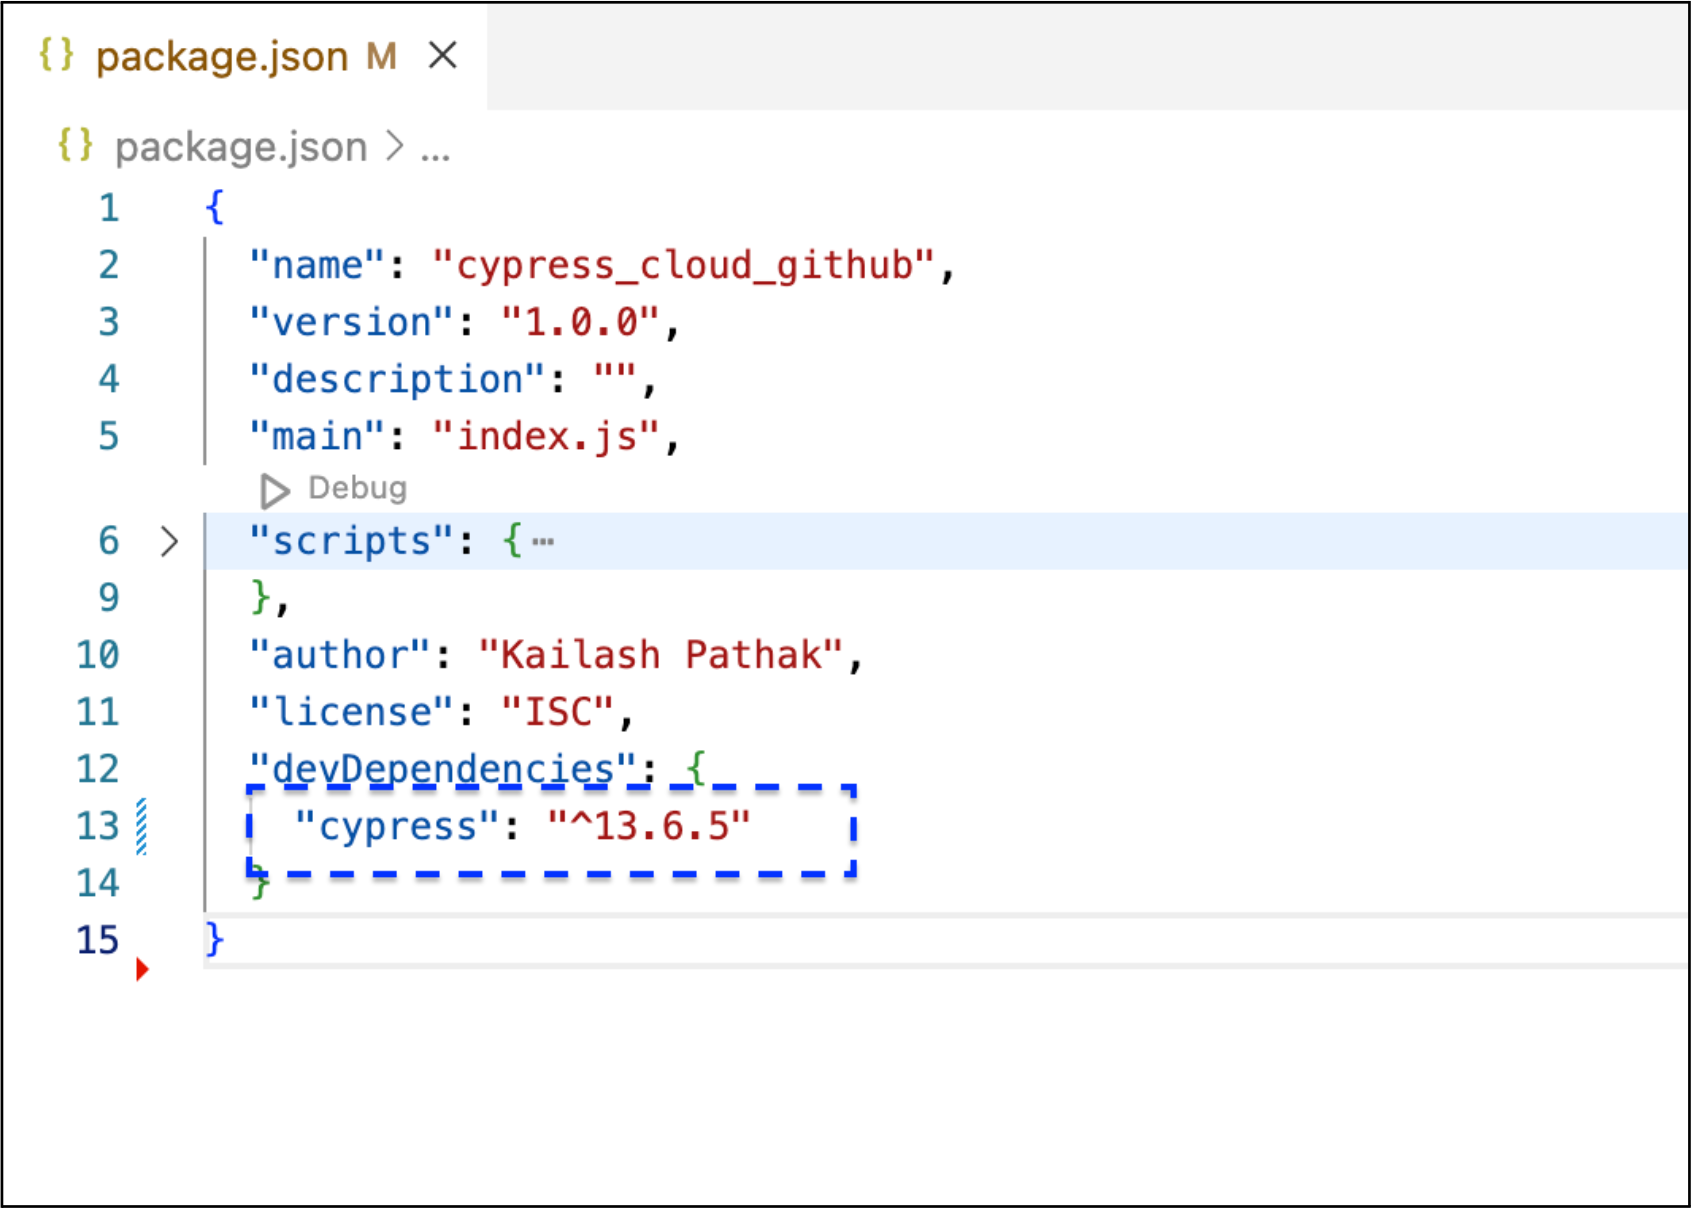
Within the root of a new or existing project to which you want to add Cypress tests (or at the root of an individual package as part of a monorepo), use the command npm install cypress --save-dev OR yarn add cypress --dev to install Cypress. In the screenshot below, you can observe that Cypress is successfully installed, with the latest version being 13.6.5 at the time of writing this blog.
Create Test Script
Once Cypress is installed you need to run ‘npx cypress open’ Or ‘yarn cypress open’. After running this command, Cypress will create the initial files and folders such as cypress.json, cypress folder (which contains test files and support files), etc. This command also opens the Cypress Test Runner, where you can execute and manage your tests effectively.
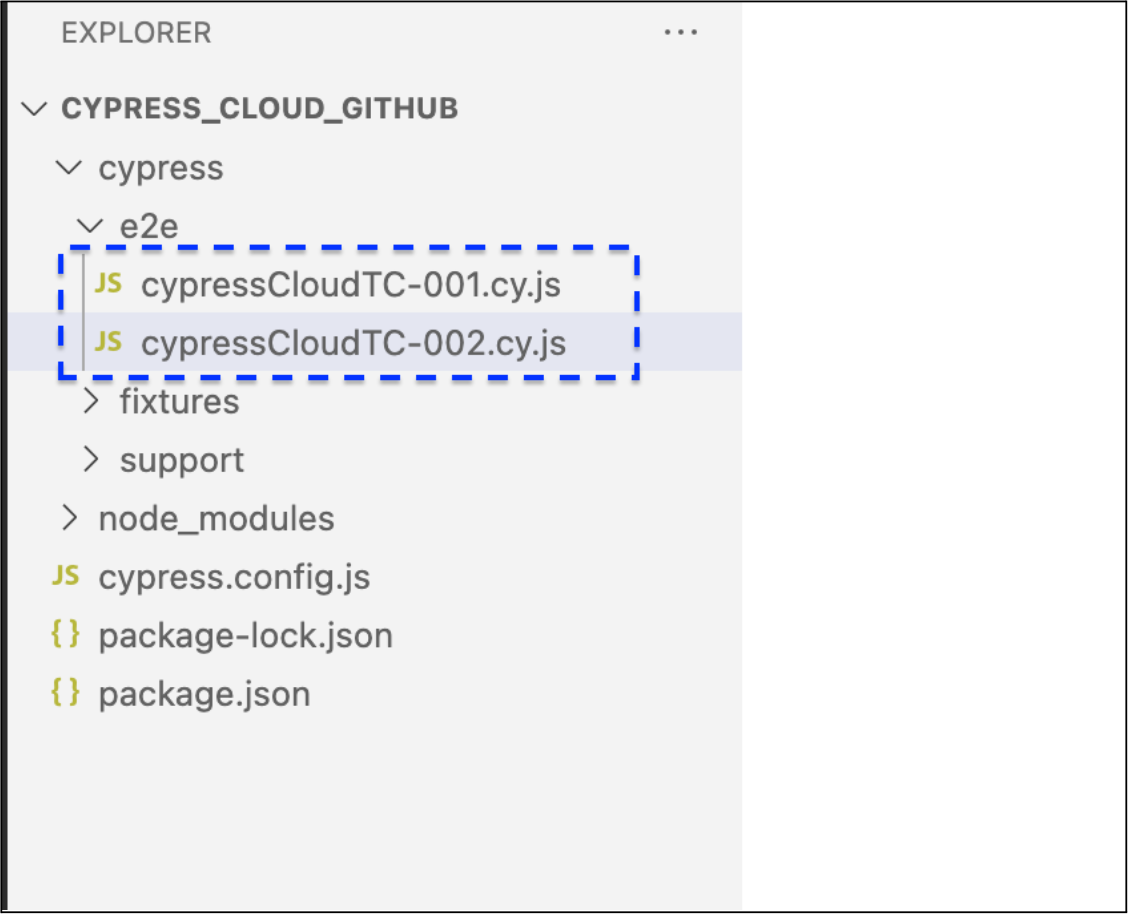
Let's generate a script for execution in Cypress Cloud by creating a test case under the 'e2e' folder named 'cypressCloudTC-001.cy.js'.
Use Case 1:
cypressCloudTC-001.cy.js
Log in to the website https://www.saucedemo.com/ and then log out.
describe('Cypress Cloud Demo', () => {
   it('Cypress Cloud Demo -01 : Login and Logout Into the Site saucedemo', function() {
    cy.visit('https://www.saucedemo.com/');
    cy.get('[data-test="username"]').clear('standard_user');
    cy.get('[data-test="username"]').type('standard_user');
    cy.get('[data-test="password"]').clear('secret_sauce');
    cy.get('[data-test="password"]').type('secret_sauce');
    cy.get('[data-test="login-button"]').click();
    cy.get('#react-burger-menu-btn').click();
    cy.get('#logout_sidebar_link').click();
   });
})

cy.contains('a','Home').should('have.attr', 'href', '/home')
Use Case 2:
cypressCloudTC-002.cy.js
Log in to the website https://www.saucedemo.com, add a product to the cart, remove the added product, and log out from the site.
describe('Cypress Cloud Demo', () => {
   it('Cypress Cloud Demo -01 : Login ,Add Product Into the Cart,Remove and Logout from the Site', function() {
       cy.visit('https://www.saucedemo.com/');
       cy.get('[data-test="username"]').clear('standard_user');
       cy.get('[data-test="username"]').type('standard_user');
       cy.get('[data-test="password"]').clear('secret_sauce');
       cy.get('[data-test="password"]').type('secret_sauce');
       cy.get('[data-test="login-button"]').click();
       cy.get('[data-test="add-to-cart-sauce-labs-backpack"]').click();
       cy.get('.shopping_cart_link').click();
       cy.get('[data-test="remove-sauce-labs-backpack"]').click();
       cy.get('#react-burger-menu-btn').click();
       cy.get('#logout_sidebar_link').click();
   });
})cy.contains('a','Home').should('have.attr', 'href', '/home')
Configure Cypress Cloud
Establishing Cypress Cloud necessitates multiple steps to guarantee a smooth integration tailored to your testing requirements. Below is a comprehensive guide to assist you in initiating the process:
Step 1:
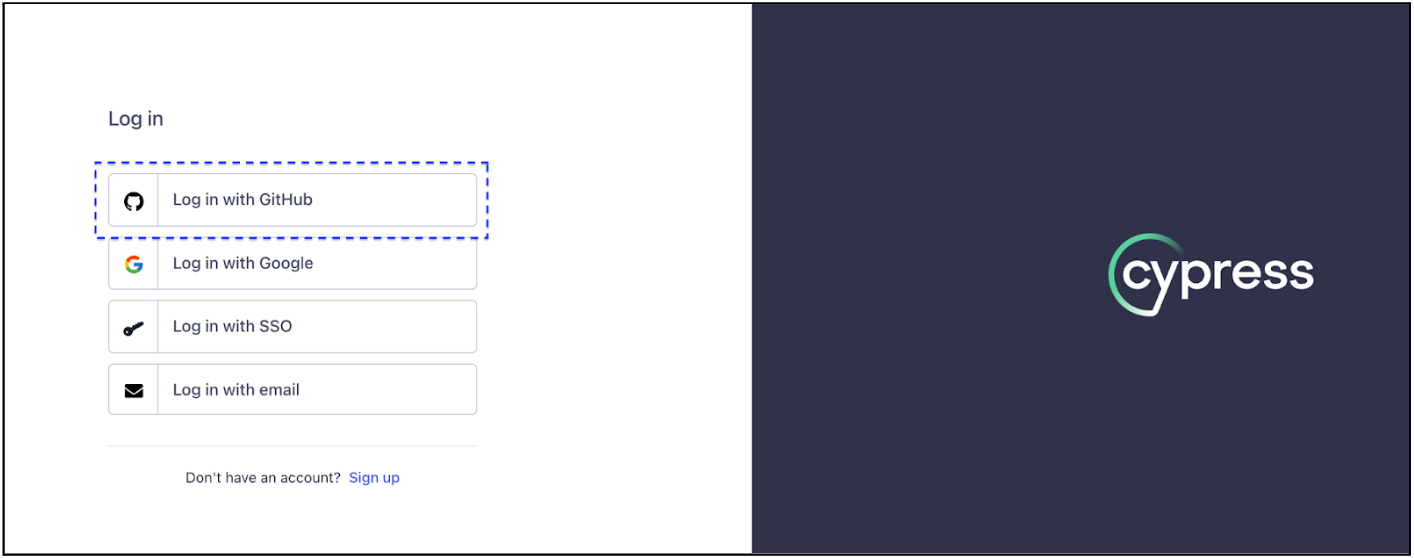
Navigate to the URL https://cloud.cypress.io/login to log in.
Step 2:
Sign in using the ‘GitHub’ option.
Step 3:
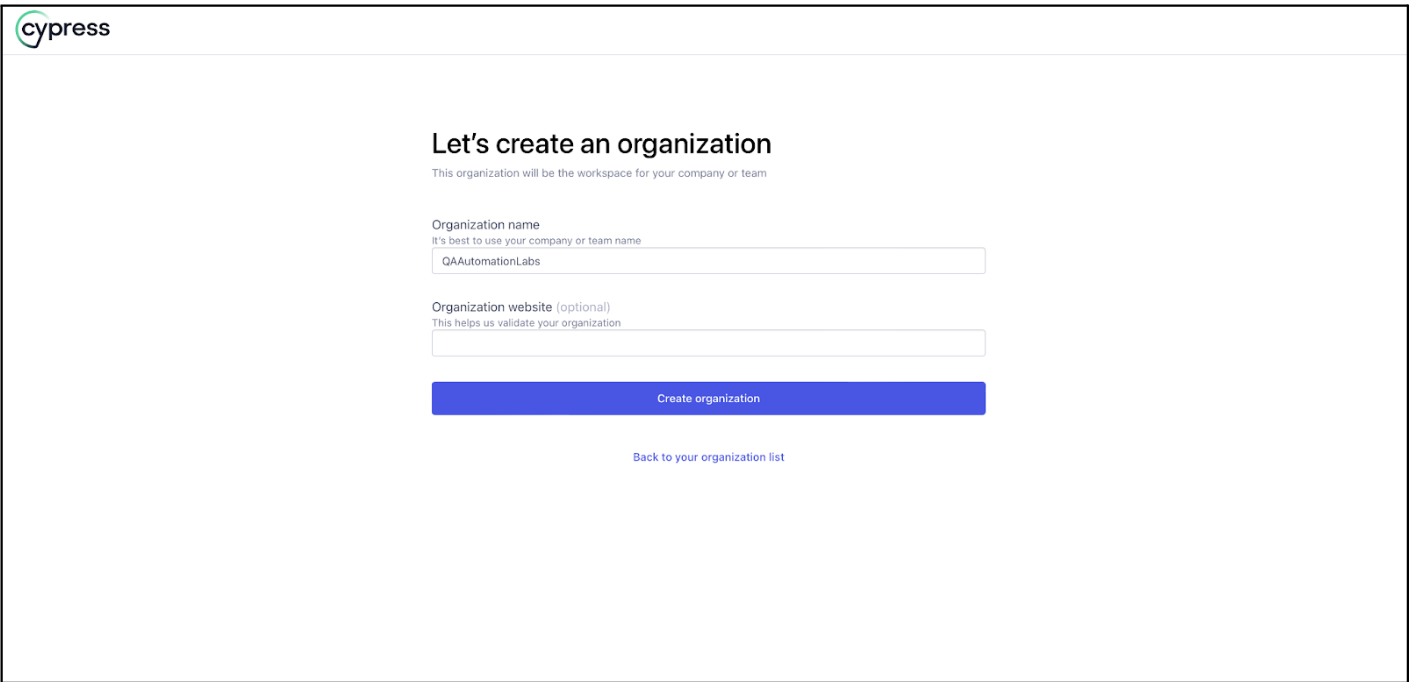
Following the login with GitHub credentials, establish the organization by selecting 'Create organization.'
Step 3:
The subsequent action involves 'Creating a New Project' within the aforementioned organization.
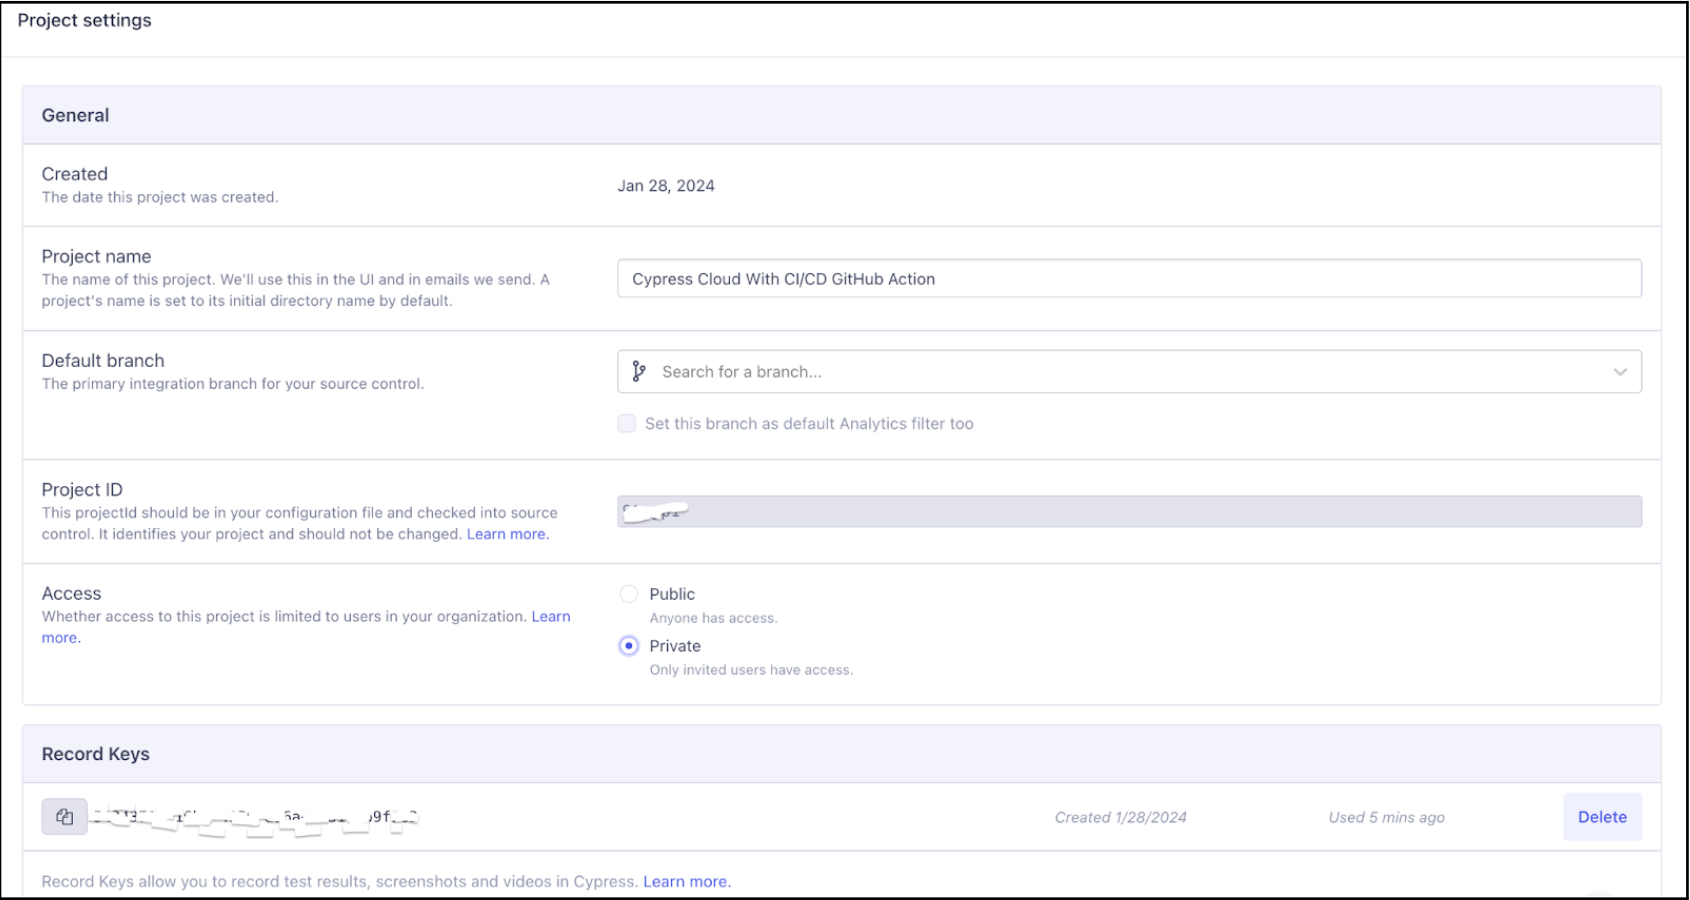
Enter the project name; for instance, let's name it 'Cypress Cloud With CI/CD GitHub Action,' and proceed to click on 'Create project.'
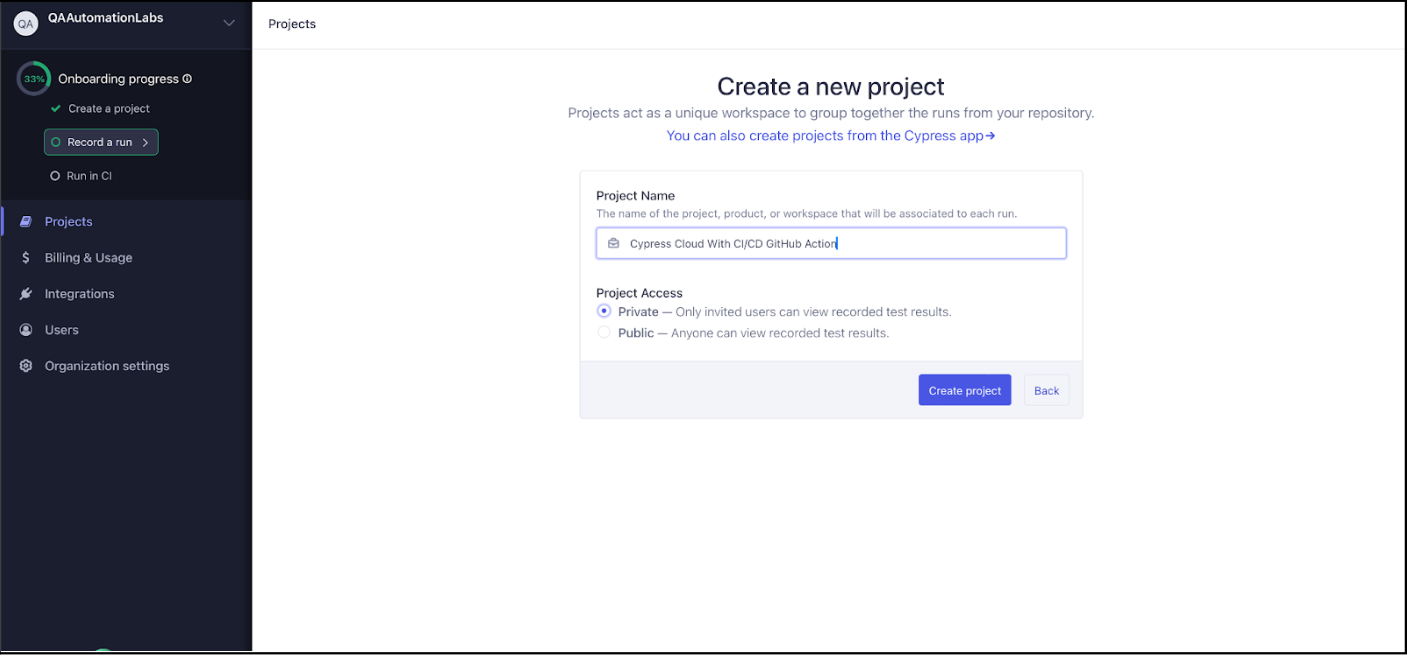
In the screenshot below, you can observe the successful creation of a new project:

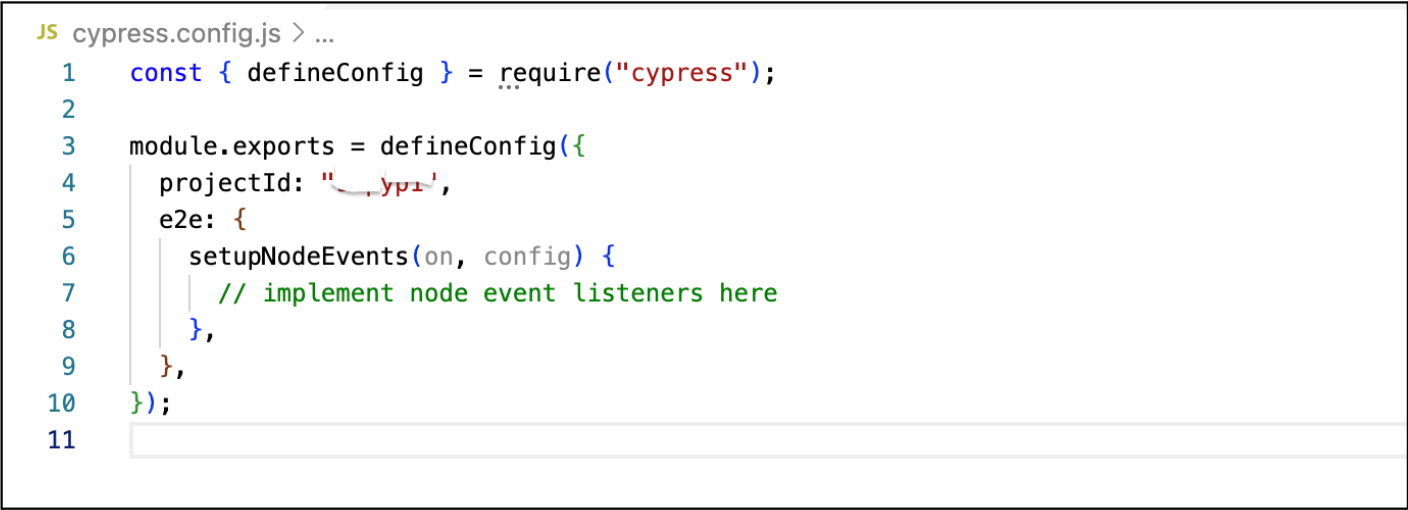
Step 4:
After configuring your project for recording, the automatically generated unique projectId should be inserted into your Cypress configuration file.
Upon completing the aforementioned steps, the integration with Cypress Cloud is complete. In the following section, you'll learn how to configure GitHub Actions.
What Is GitHub Actions?
GitHub Actions is a comprehensive automation and CI/CD (Continuous Integration/Continuous Deployment) service provided by GitHub. It empowers you to automate various tasks within your software development workflow, including code building, testing, and deployment. Utilizing YAML files, you can define workflows in GitHub Actions to specify how your code should be processed in response to events such as pushes, pull requests, or other custom triggers.
Key Features of GitHub Actions:
Workflow Automation: GitHub Actions allows you to create custom workflows using YAML syntax. Workflows can be composed of one or more jobs, each consisting of multiple steps.
Ease of Use: Even for those not well-versed in CI/CD, GitHub Actions is user-friendly, providing a straightforward starting point with just a few simple steps.
Environment Variables: Easily configure and pass parameters between different steps in your workflow by defining and using environment variables.
Customization: Tailor workflows to suit the specific needs of your project. Leverage various actions and triggers for creating workflows that align with your unique requirements.
Integration: Seamlessly integrate with a range of third-party tools and services. GitHub Actions enables the automation of tasks that would typically demand manual intervention.
YAML Configuration: Workflow configurations are expressed using YAML syntax, ensuring clarity and version control alongside your codebase.
Parallel Jobs: Execute jobs within a workflow concurrently, enhancing the overall speed of workflow execution. This feature is particularly advantageous for tasks that can run independently.
Artifacts: Workflows can generate artifacts, which are files or directories preserved after a job concludes. Artifacts prove valuable for storing build outputs, test results, and more.
Set Up CI/CD GitHub Action
Step 1 : Create Repository
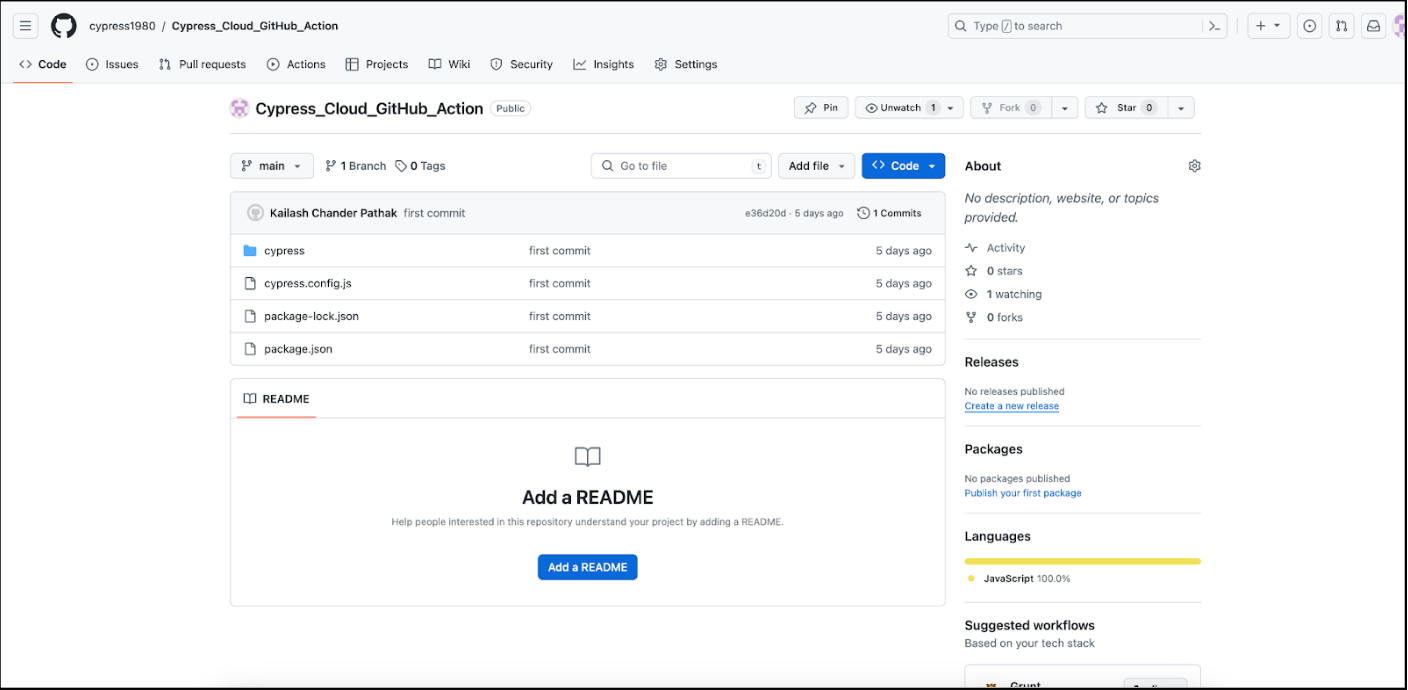
Create a repository named 'Cypress_Cloud_GitHub_Action' on GitHub. The repository should be empty initially, containing no code.
Step 2: Push the code
Upload the code for the aforementioned use cases to the repository. Once the code has been pushed, you will observe the updated code displayed within the repository.
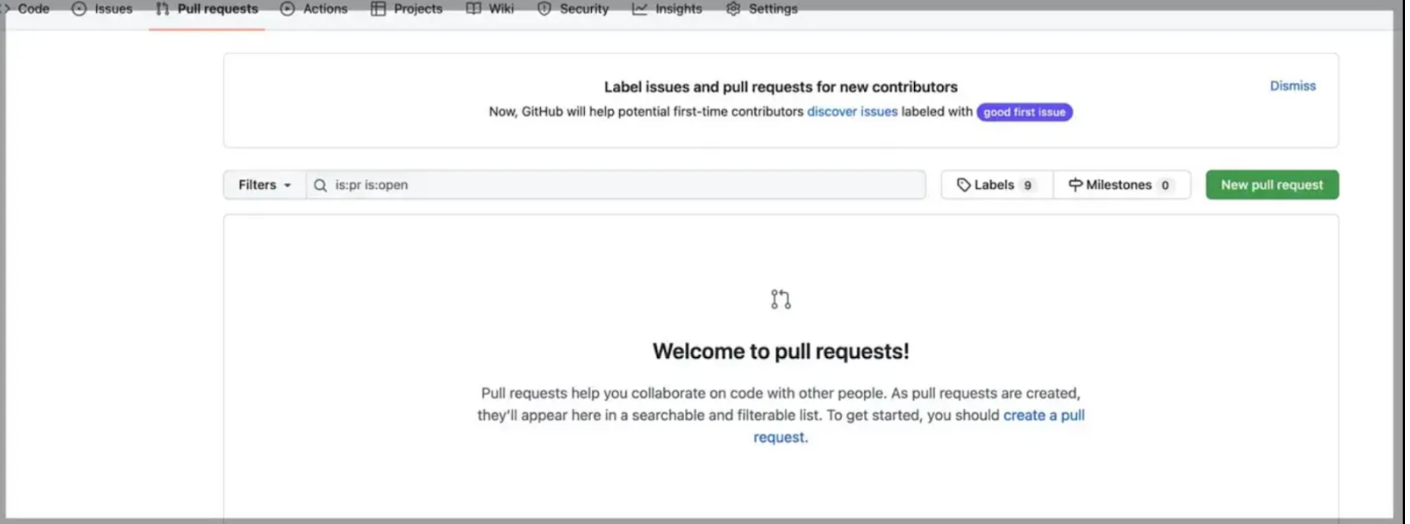
Step 3: Configure workflow
After pushing the code, navigate to the ‘Actions’ tab.
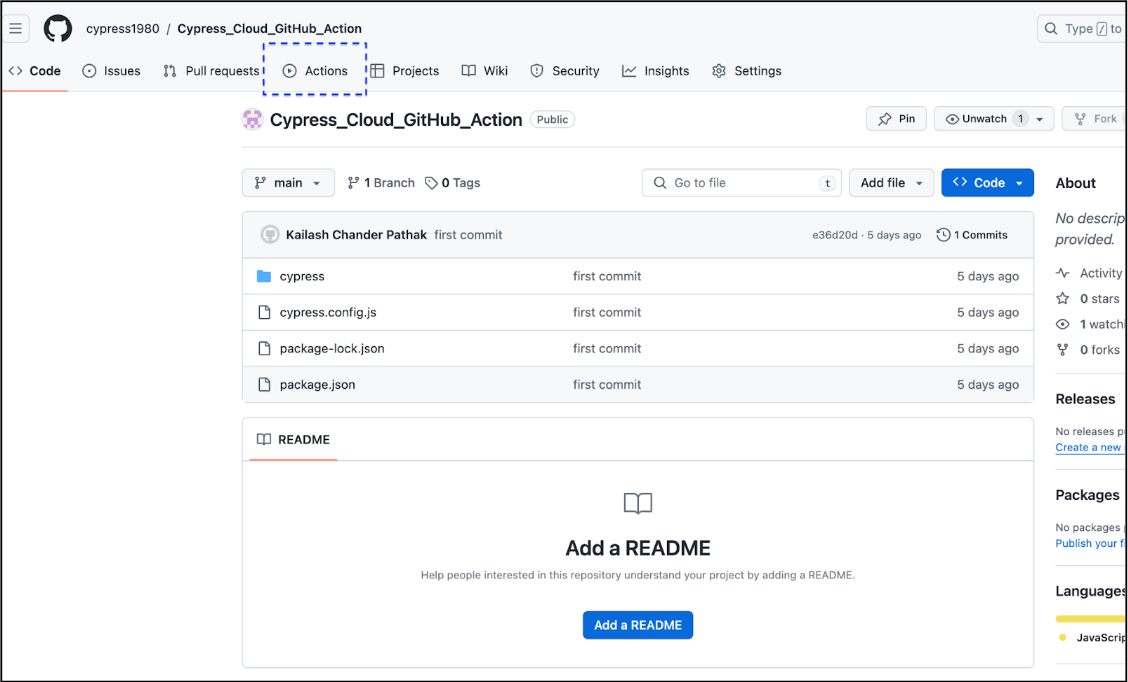
Select the "Configure" button (Automation -> Manual workflow -> Configure).
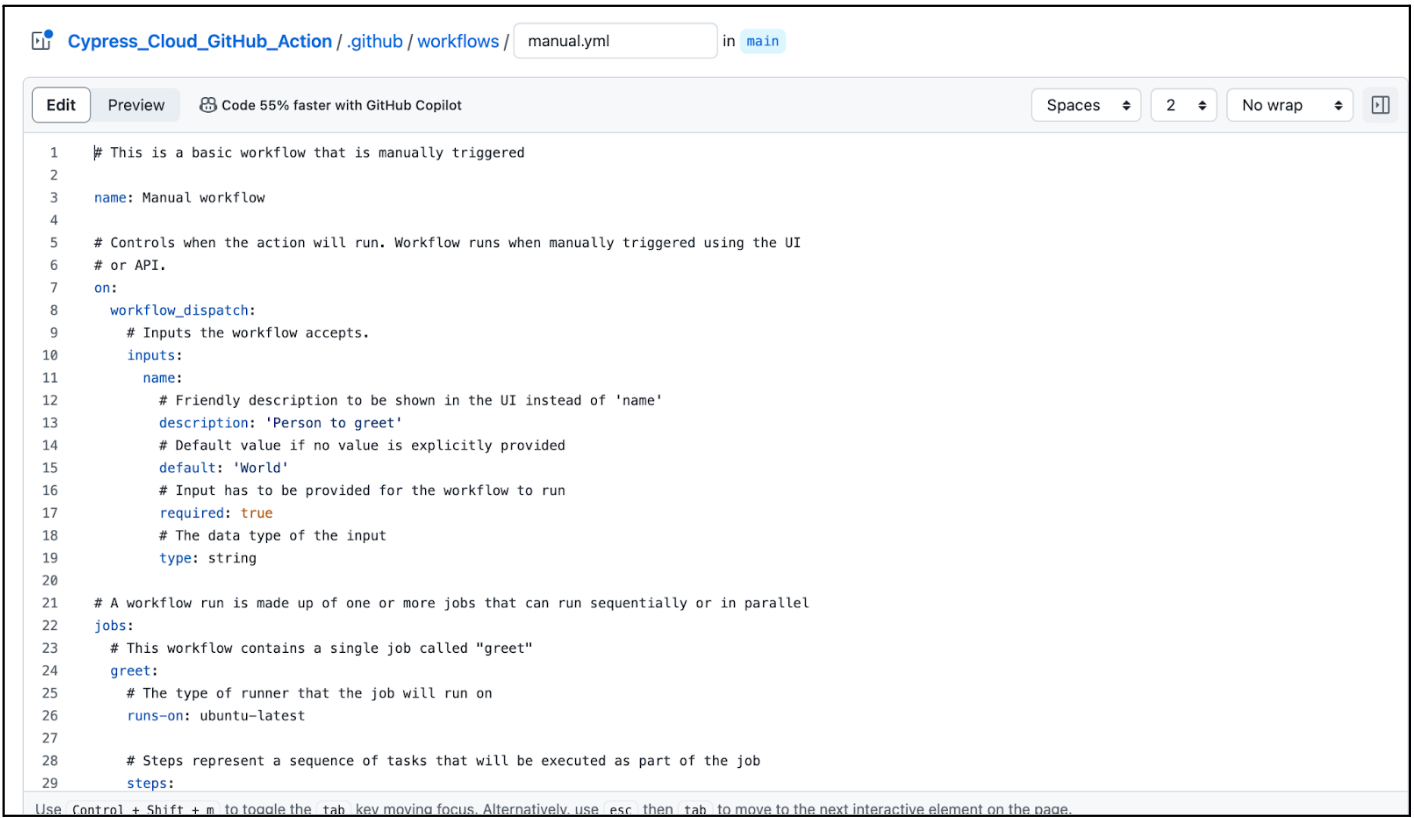
Step 4: Update .yml file
After clicking the 'Configure' button, a file named 'manual.yml' will be created under the project/.github/workflow directory.
name: QAAutomationLabs.com Parallel Cypress Tests

on: [push]

jobs:
 test:
   name: Cypress Cloud GitHub
   runs-on: ubuntu-latest
   container: cypress/browsers:node18.12.0-chrome107
   strategy:
     fail-fast: false
     matrix:
       containers: [1,2,3,4]
   steps:
     - name: Checkout
       uses: actions/checkout@v4

     - name: Cypress Cloud GitHub
       uses: cypress-io/github-action@v6
       with:
         record: true
         parallel: true
         group: 'QAAutomationLabs'
       env:
         CYPRESS_RECORD_KEY: ${{ secrets.CYPRESS_RECORD_KEY }}
         GITHUB_TOKEN: ${{ secrets.GITHUB_TOKEN }}cy.contains('a','Home').should('have.attr', 'href', '/home')
Let’s explain the above .yml file
Explanation:
- name: Specifies the name of the workflow.
- on: Specifies the trigger event for the workflow. In this case, the workflow is triggered on any push event.
- jobs: Defines a list of jobs that the workflow will run. In this example, there is a single job named "test."
- test: Specifies the configuration for the "test" job.
- name: The name of the job.
- runs-on: Specifies the type of runner for the job. In this case, it runs on the latest version of Ubuntu.
- container: Specifies the Docker container to use for the job. In this example we have used the cypress/browsers: node v18.12.0-chrome 107 container, which includes Node.js and Chrome.
- steps: Specifies a list of steps that make up the job.
- Checkout: Uses the actions/checkout action to fetch the repository's code.
- Cypress Cloud GitHub: Uses the cypress-io/github-action action to run Cypress tests in parallel.
- with: Specifies the parameters for the Cypress action, including recording tests (record: true), running tests in parallel (parallel: true), and grouping tests under 'QAAutomationLabs.'.Setting parallel: true allows the tests to run concurrently, which can significantly reduce the overall test execution time, especially for large test suites
- env: Sets environment variables for the action, including the Cypress Cloud record key and the GitHub token.
Please verify that the essential secrets (CYPRESS_RECORD_KEY and GITHUB_TOKEN) are configured within your GitHub repository. These are necessary for enabling the action to access the required credentials.
GITHUB_TOKEN is automatically generated and doesn't require storage as a secret. Storing it as such can lead to issues where the same token is used, potentially causing problems with Cypress execution.
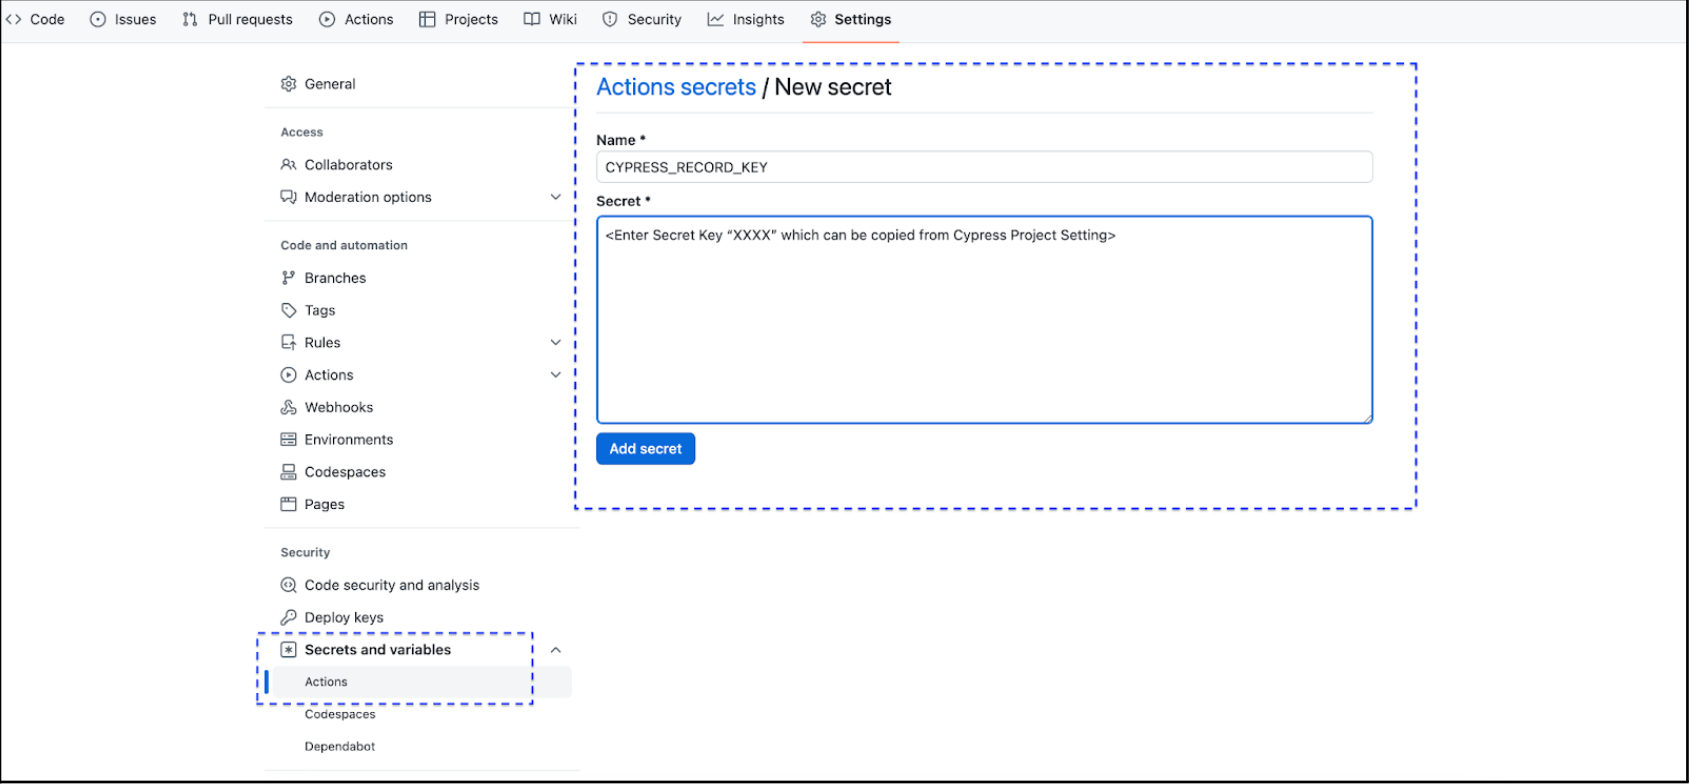
Step 5: Configure the environment variable named 'CYPRESS_RECORD_KEY'
Click on Setting then - > Secrets
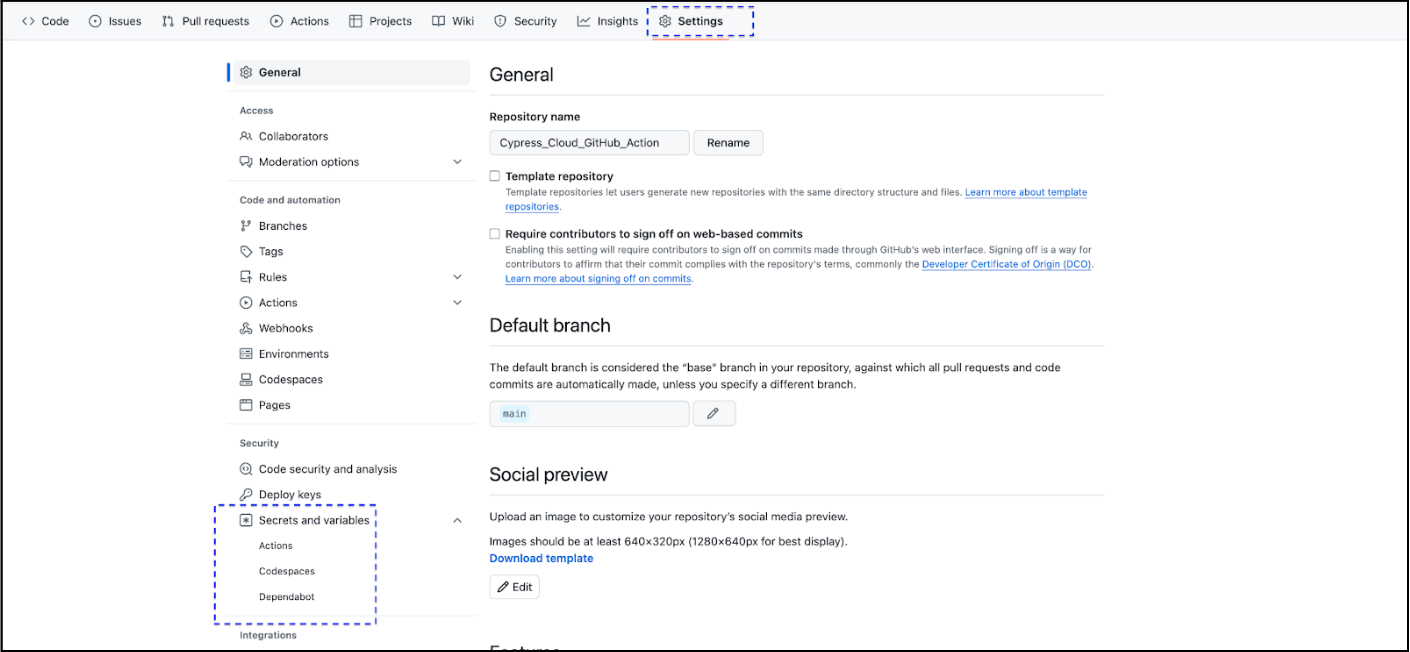
Input the secret key 'XXXX', which can be copied from the Project Settings. Refer to the attached screenshot for guidance.
We've completed all necessary setup for executing the test case. In the following section, you'll learn how to execute the test cases concurrently using GitHub Action and Cypress Cloud.
But before that let's examine how CI interacts with Cypress Cloud before proceeding with the test case execution on GitHub.
How CI Machines Interact with Cypress Cloud
Cypress Cloud's parallelization mode optimizes the execution of test runs across CI machines by efficiently distributing spec files based on estimated durations.
The process involves the following steps:
- CI Machines Contact Cypress Cloud: CI machines establish communication with Cypress Cloud, indicating which spec files are part of the project and available for execution.
- Opt-In to Receive Spec Files: Each CI machine signals its readiness to execute spec files by contacting Cypress Cloud.
- Estimation of Spec File Durations: Cypress calculates the estimated time required to test each spec file.
- Load-Balancing Spec Files: Spec files are distributed or load-balanced across the available CI machines in a manner that minimizes the overall test run time. This distribution is based on the estimated durations calculated earlier.
- Execution and Redistribution: As each CI machine completes the execution of its assigned spec file, Cypress Cloud redistributes more spec files to it. This process continues until all spec files are executed.
- Completion and Waiting Period: Upon completion of all spec files, Cypress Cloud enters a configurable waiting period before considering the test run fully complete. This waiting period allows for better support of grouping runs.
In the next section, you will discover how to enhance test case execution performance by running the test cases in parallel.
Various Execution Examples (Execute Test Cases In Parallel)
Let's execute the test cases using different numbers of containers and observe the output and time taken for each execution. The following use cases demonstrate the benefits of running test cases in parallel.
Pre-Condition: We have four test cases to execute.
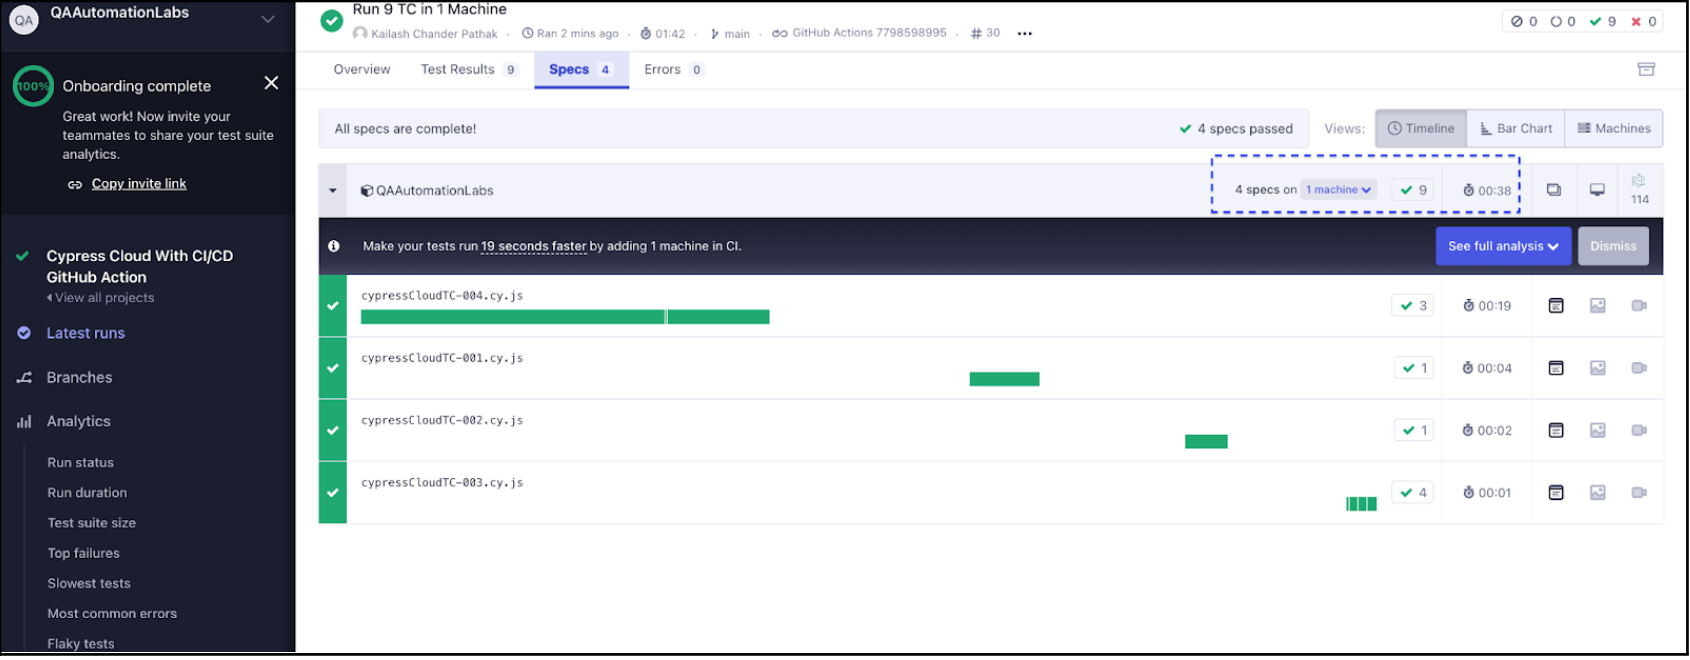
Use Case 1 (Single Machine / Non Parallel)
First use case is running the test case in non-parallel on a single machine. To do this, we need to update the container configuration to containers: [1] in the .yml file.
In the screenshot below, you can see that all four test cases were executed on a single machine. The total time taken for execution was approximately ~0.38 seconds.
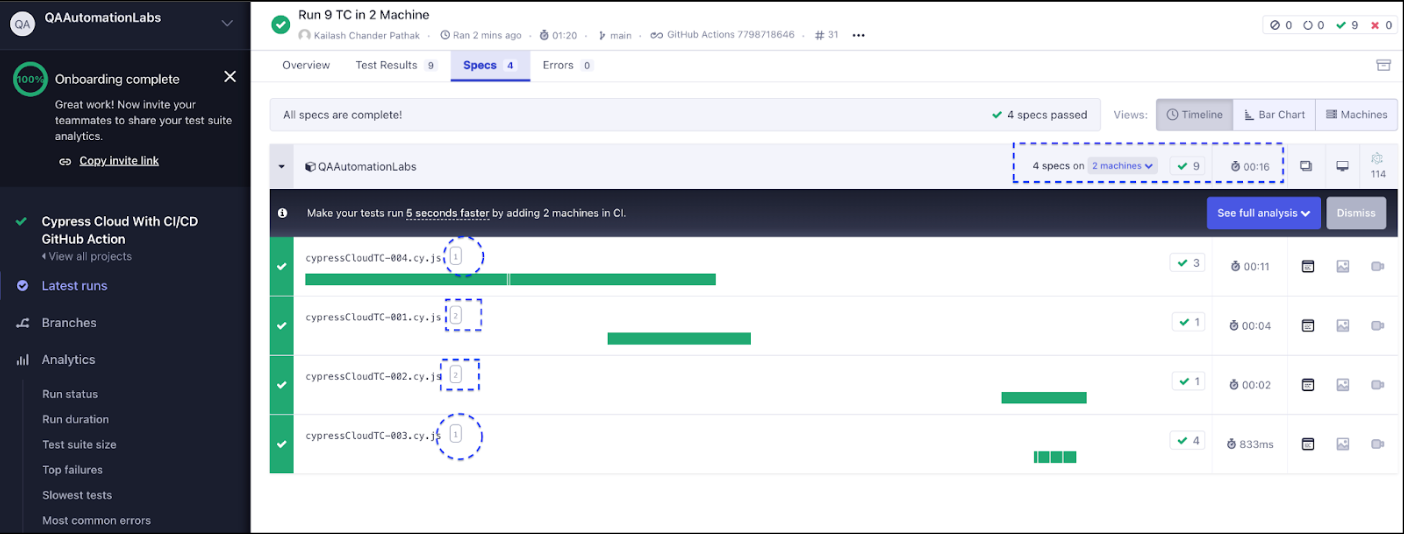
Use Case 2 (Two Machines / In Parallel)
Execute the four test cases on two machines. To do this, update the container configuration to containers: [1,2] in the .yml file.
In the screenshot below, you can observe that all four test cases were executed on two machines. Test cases 1 and 2 were executed on machine 2, while test cases 3 and 4 were executed on machine 1.
The total execution time was approximately ~0.16 seconds, almost half the time taken when running the test cases on a single machine.
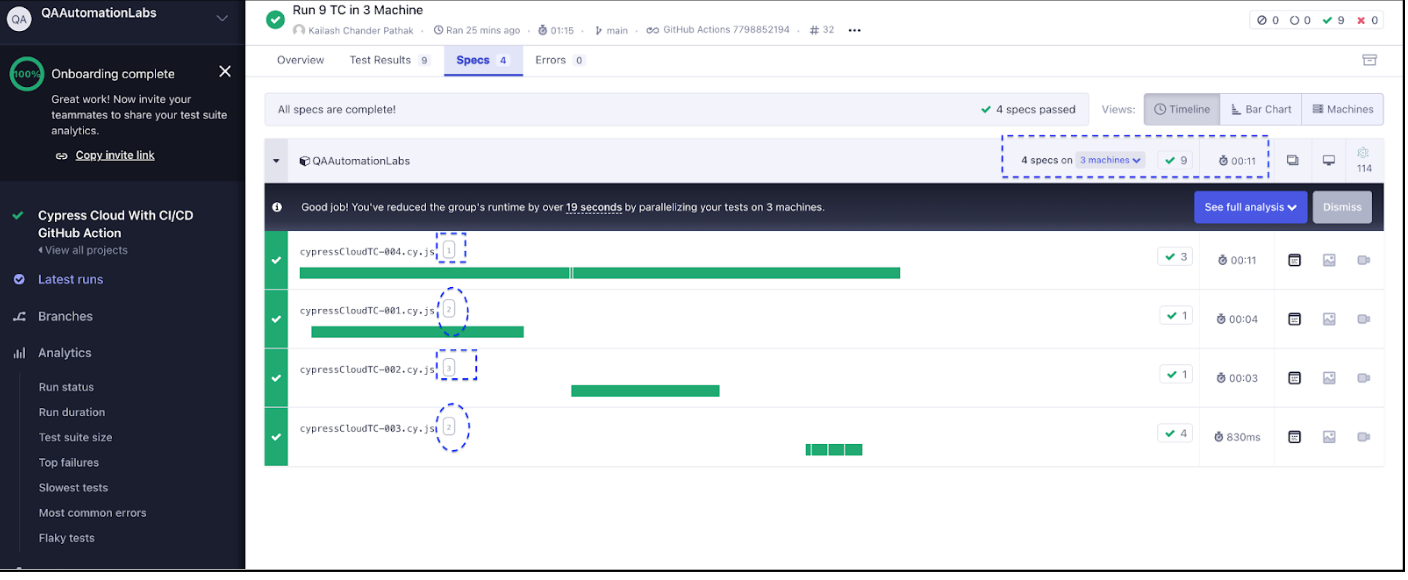
Use Case 3 (Three Machines / In Parallel)
Execute the four test cases on three machines. To do this, update the container configuration to containers: [1,2,3] in the .yml file.
In the screenshot below, you can observe that the four test cases were executed on three machines. Test cases 1 and 3 were executed on machine 2, test case 2 on machine 3, and test case 4 on machine 1.
The total execution time was approximately ~0.11 seconds, which is less compared to when running the test cases on two machines.
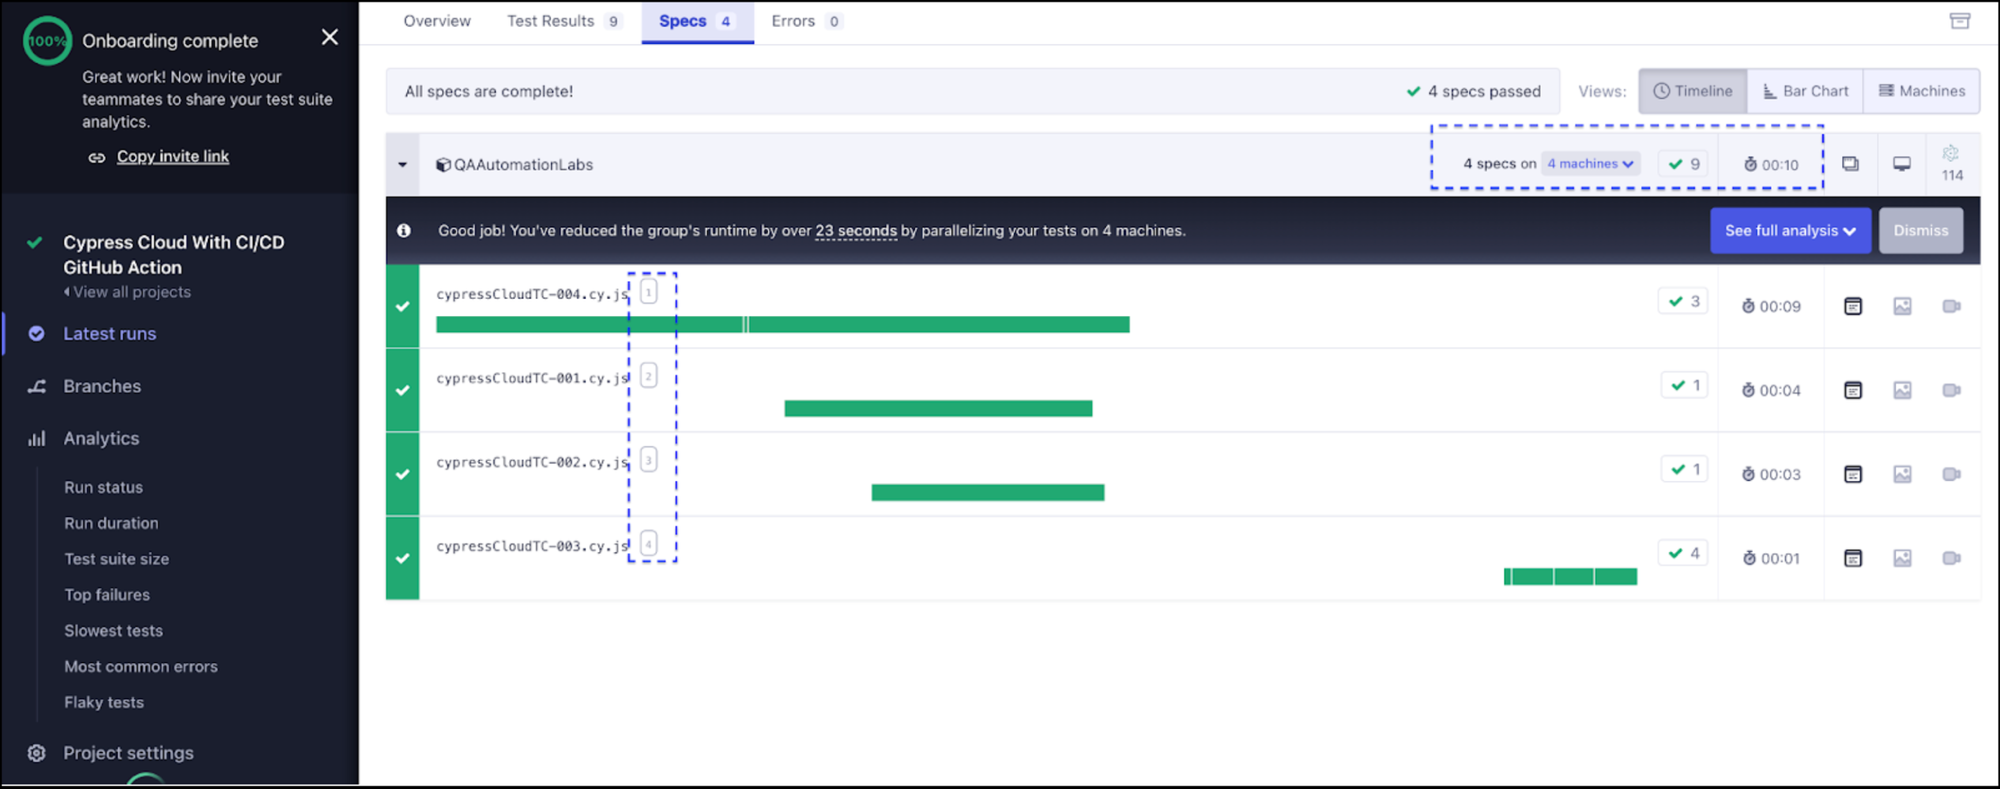
Use Case 4 (Four Machines / In Parallel)
Execute the four test cases on four machines. To do this, update the container configuration to containers: [1,2,3,4] in the .yml file.
In the screenshot below, you can observe that all four test cases were executed on four machines. Test cases 1 and 3 were executed on machine 2, test case 2 on machine 3, and test case 4 on machine 1.
The total execution time was approximately ~0.10 seconds.
From the table below, it's evident that as we increase the number of machines and execute the test cases in parallel, the execution time starts to decrease.
Analyzing Test Results in Cypress Cloud
Cypress Cloud offers invaluable analytical insights into your test runs, including trends over time, pass rates, failure rates, and various metrics. By harnessing these insights, you can pinpoint patterns, identify trends, and uncover areas for enhancement within your testing workflow.
Below are explanations for some of the metrics that are available to you in Cypress Cloud:
Run Status:
This segment offers a concise overview of the general status of test runs, encompassing the count of tests that passed, failed, and those awaiting execution. It serves as a rapid assessment of the overall health of your test suite.

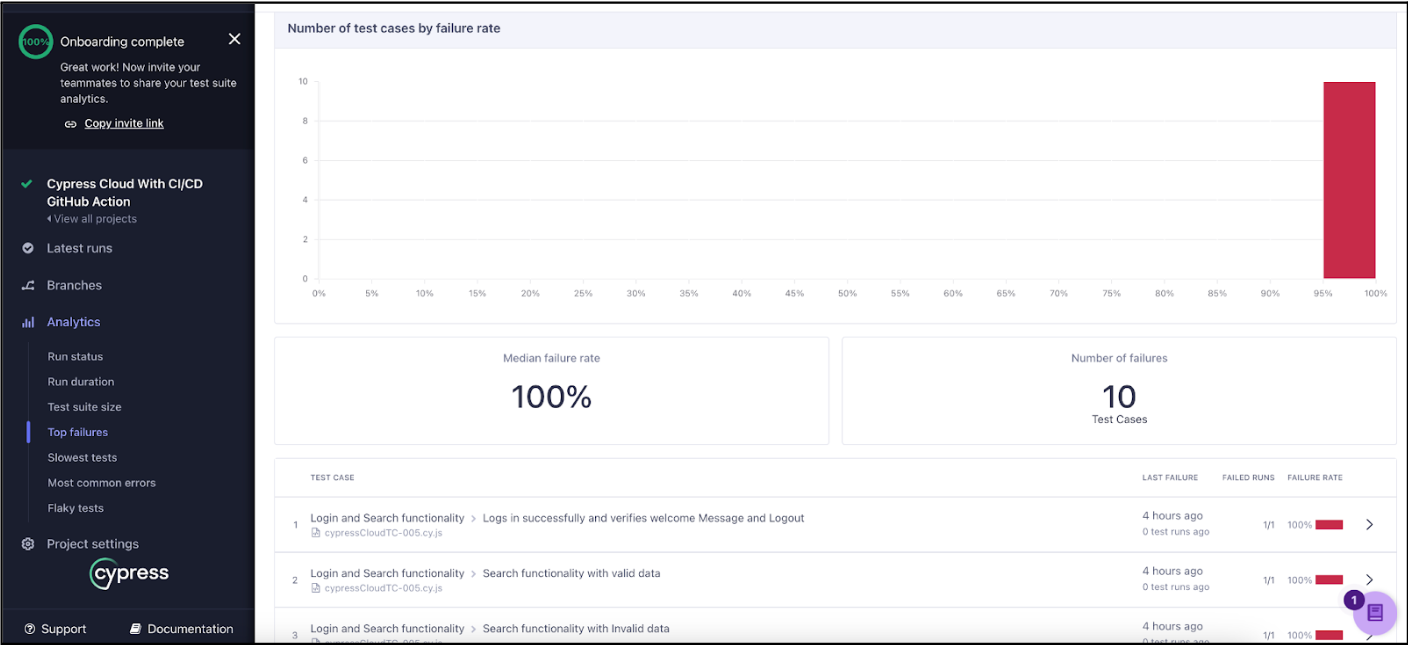
Top Failures:
Spotlights the most recurrent or significant test failures, facilitating the prioritization of debugging tasks and the resolution of critical issues promptly.
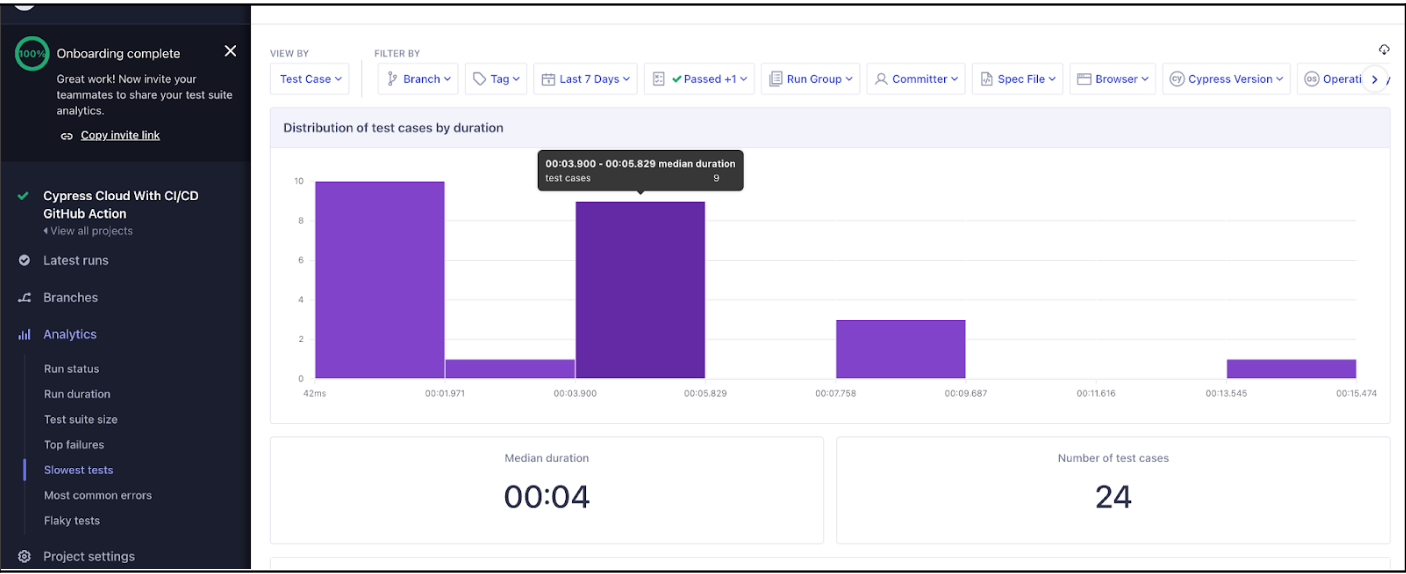
Slowest:
Pinpoints tests with the highest execution durations, aiding in the optimization of test performance and minimizing overall execution time.
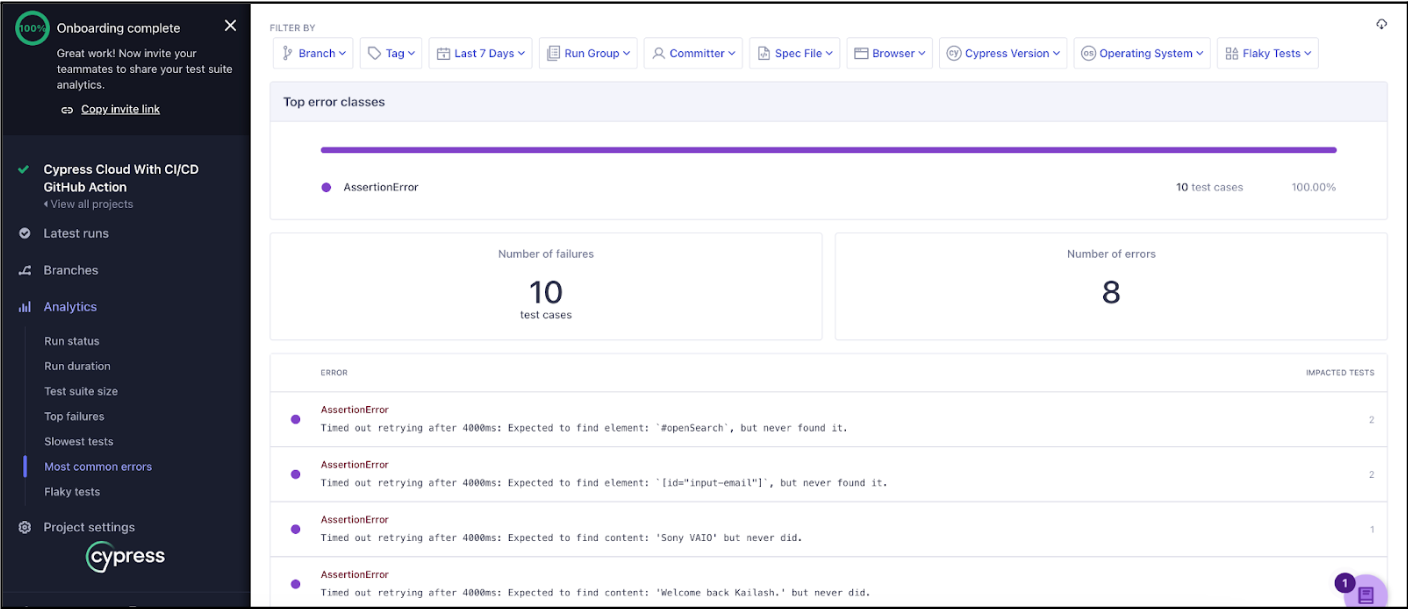
Most Common Errors:
Enumerates the errors that occur most frequently during test execution, facilitating the identification of recurring issues and enabling systematic resolution.
As we've explored the benefits of parallel test execution throughout this blog post, leveraging the Cypress Dashboard becomes even more impactful. It allows you to not only monitor the efficiency gains achieved through parallelization but also empowers you to continuously refine and optimize your testing strategy for maximum effectiveness!
Conclusion
The integration of Cypress Cloud with CI/CD through GitHub Actions represents a significant advancement in bolstering the testing infrastructure for web applications. By seamlessly merging the robust capabilities of Cypress Cloud with the automation prowess of GitHub Actions, development teams can enhance the efficiency and reliability of their testing processes.
Cypress Cloud offers a comprehensive array of features, ranging from detailed analytics that depict the health of your test suite over time to intelligent orchestration that optimizes test execution across multiple machines. The ability to review, debug, and analyze past test results, combined with the seamless integration with popular CI/CD tools, positions Cypress Cloud as a valuable asset in the modern development toolkit.